How to Set Up a Control Room Video Wall Using Commercial Computers
Building a high performance control room video wall no longer requires expensive proprietary hardware matrices. By leveraging standard commercial computers and advanced visual data analytics software like Lygos, you can create a highly scalable multi million pixel seamless display environment.
This comprehensive guide will walk you through setting up a control room video wall from scratch using commercial PCs and the Lygos platform.
1. Defining the Video Wall Formation and Size
The first step is to establish the physical layout and scale of your video wall. You might be building a 2x2 grid for a small security room or a massive 4x12 array for a global operations center.
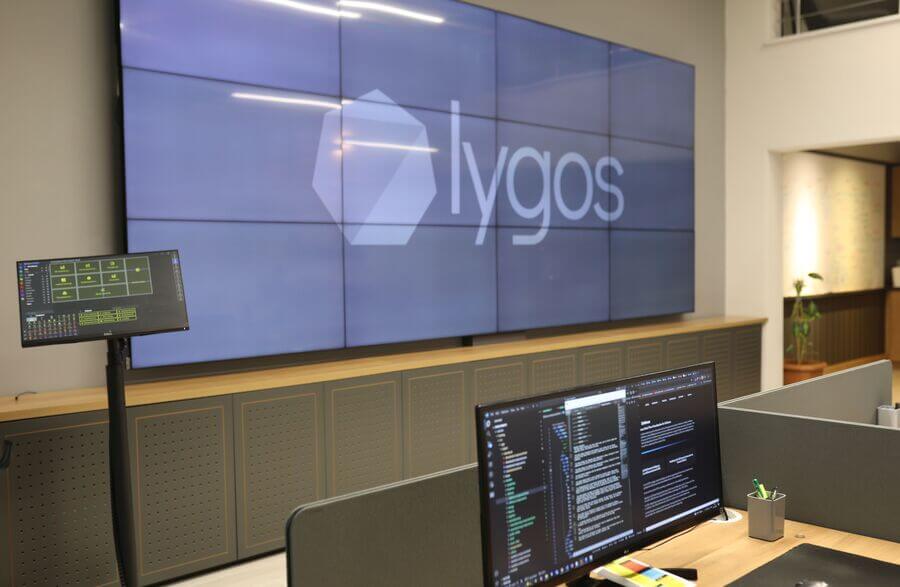
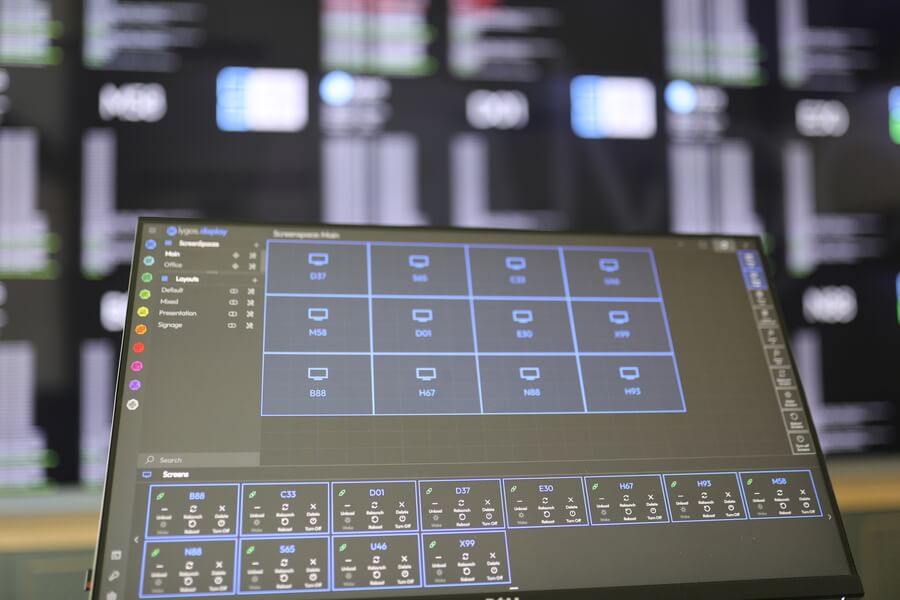
When using Lygos, your physical screen formation is entirely flexible. Through the software Display Module, you can group multiple distributed screen nodes into a single virtual Screenspace. This allows the system to treat an entire grid of individual commercial displays as one massive seamless canvas that is perfectly synchronized for real time data analytics and media.
2. Hardware Configuration and Scalability
Instead of buying a single massive video wall controller, you can utilize a distributed architecture.
Supporting 3 to 6 Screens Per PC
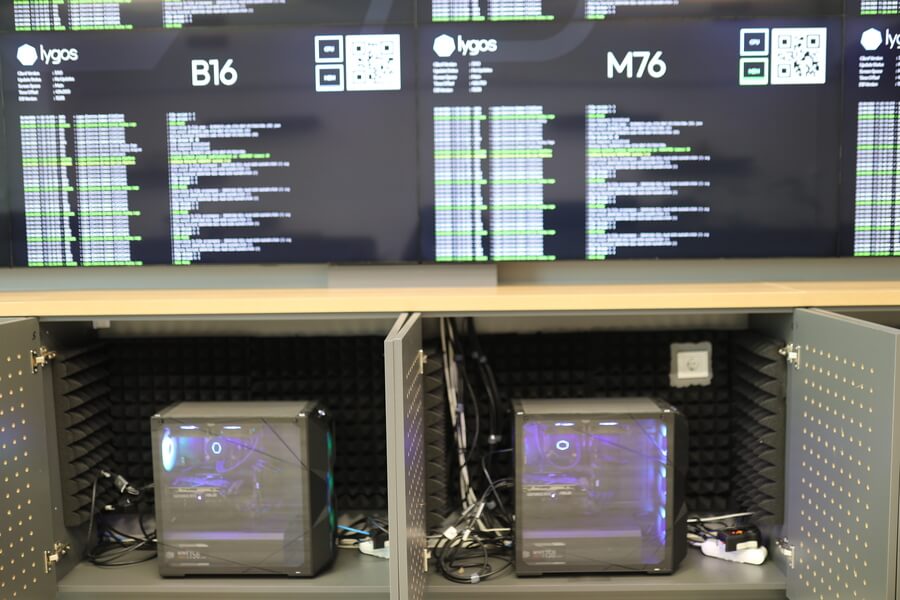
A standard commercial PC equipped with a capable dedicated graphics card can comfortably output to multiple displays simultaneously. Depending on your total screen count, you can deploy a single PC to drive the entire wall or use multiple PCs in a distributed setup.
- Single PC Advantage: Smoother video rendering natively since no network synchronization is required.
- Distributed PC Advantage: Endless scalability. If you need a 64 screen wall, you can simply network multiple PCs together. Lygos synchronizes these separate machines over your local network so they operate as one cohesive unit.
3. Connecting Commercial PCs to Your Video Wall Displays
Once your hardware is mounted, connect your commercial PCs to the displays using standard HDMI or DisplayPort cables.
In a distributed setup, ensure all the PCs driving the screens (the Screen Clients) and the main administrative PC (the Server) are connected to the same high speed Local Area Network. The Lygos architecture relies on network communication rather than physical video cables to sync content across different machines.
4. Selecting and Installing the Operating System
Commercial computers give you the freedom to choose your operating system based on your IT department security policies and budget. Lygos is cross platform compatible and runs natively on Windows, macOS, and Linux.
For a dedicated control room environment, installing a stable Linux distribution or Windows enterprise edition ensures maximum uptime and compatibility with the Lygos software infrastructure.
5. Installing the Lygos Software and Configuring Nodes
Download and install the Lygos software on all machines involved in the video wall network.
- Setting Up the Central Hub: Designate one PC to run in Local Mode. This acts as the central Server and database.
- Setting Up the Video Wall Displays: Launch the Lygos application on the commercial PCs connected to your displays and set them to Remote Mode.
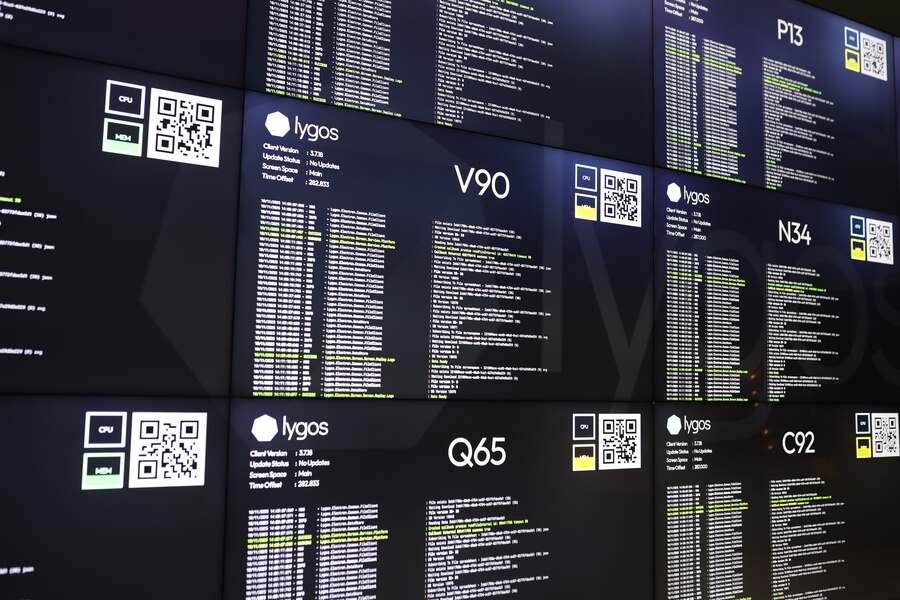
- Access Control: Use a Screen Key to authenticate these nodes. This key utilizes Lygos level based access control, granting the nodes minimal security privileges. This allows them only to display content, preventing unauthorized control or management from the video wall screens themselves.
6. Enabling Auto Launch and Server Reconnection
For a seamless control room experience, the video wall should recover automatically after power cycles or IT maintenance.
- Configure your operating system to auto launch the Lygos application on startup. Lygos will remember the exact window positions of your Screen Clients across your multiple displays.
- Because they are configured in Remote Mode with their Screen Keys, they will automatically look for the Lygos Server Instance on the network and reconnect.
- Remote Power Management: Through the Lygos Display Module, operators can remotely manage the power states of these commercial PCs using Wake on LAN to boot them up, execute Remote Shutdowns, and trigger remote Lygos app relaunches without ever leaving the management desk.
7. Adjusting Bezels for a Seamless Visual Experience
When displaying large maps or data charts across multiple commercial TVs or monitors, the physical frames of the screens can break lines and distort text.
Lygos features a built in bezel compensation tool to eliminate these visual artifacts:
- Open the Screenspaces Menu in the Display Module.
- Trigger the Show Test function via the Quick Action Menu. This overlays a calibrated test pattern across all screens on your video wall.
- Open the configuration settings and adjust the bezel size sliders until the lines of the test pattern align perfectly across the physical gaps. The software will calculate the exact overdraw needed, creating a flawless visual experience.
8. Deploying Content to Your Video Wall Layouts
With the hardware and software configured, you can now use the Management Client to design Layouts and deploy dynamic content to your video wall Screenspace.
Deploying Multimedia Assets
Use the Media Module to deploy diverse operational content. You can drop multi page PDF documents and briefings onto the wall, display Deep Zoom gigapixel satellite imagery, or utilize the built in Kanban boards for team coordination. For security and surveillance, you can easily deploy live RTSP camera streams, IPTV feeds, or embed external web pages and news RSS feeds directly into dynamic slots on the wall.
Creating Live Operational Dashboards
Transform your screens into live operational dashboards using the Data and Visualization Modules. Connect to over 15 different database types like SQL or MongoDB, or stream live IoT data via MQTT and REST APIs. You can then map this data to over 20 animated chart types. These visualizations update in real time and can be remotely interacted with using the Lygos tablet or PC editors and controls.
Integrating High Resolution GIS Maps
For geospatial intelligence, utilize the Maps Module to deploy interactive GIS mapping that scales up to 100 million pixels without losing resolution. You can import GeoJSON or KML files, connect live tracking feeds for fleet management, and stack multiple analytical layers. Apply Heatmaps to show incident density, Marker layers for asset locations, and custom GeoJSON polygons to outline territories. All of these map elements will be perfectly synchronized and dynamically animated across your commercial PC video wall setup.